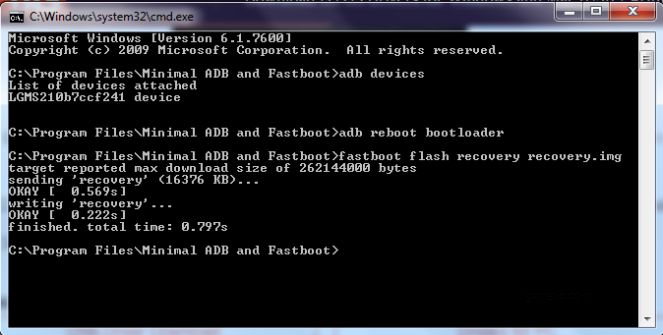
The TWRP recovery image is flashed successfully. Remove the battery to turn OFF the phone.
To boot in TWRP –
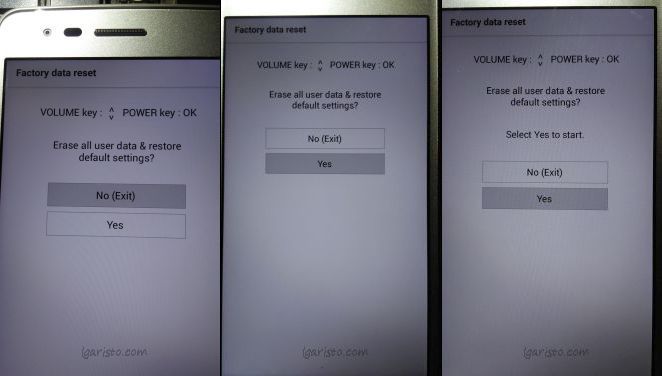
Press the volume down and power button. As soon as LG logo appears on the screen temporarily release the power key and hold it back again. Make sure you don’t release the volume down key in the entire process.
Now use volume down key to move down to “Yes” and select power key to confirm this action
Again use volume down to move to “Yes” and confirm with Power Key.
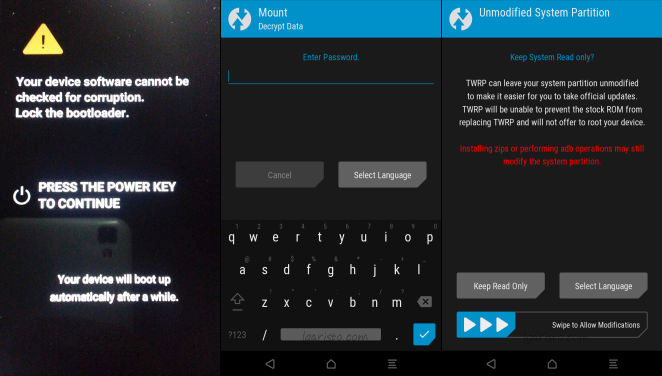
As the bootloader is locked you’ll see this warning screen it’s normal. Press Power key to continue
For the first time when you boot in TWRP, it’ll ask for the password, click on “cancel”.
Agree to keep the system partition read-only by swiping the bar towards the right as shown above.

Now we’re in TWRP but there’s a need to flash “no-verity-opt-encrypt-5.1.zip” file otherwise, the custom recovery will be replaced with stock recovery in the next reboot.
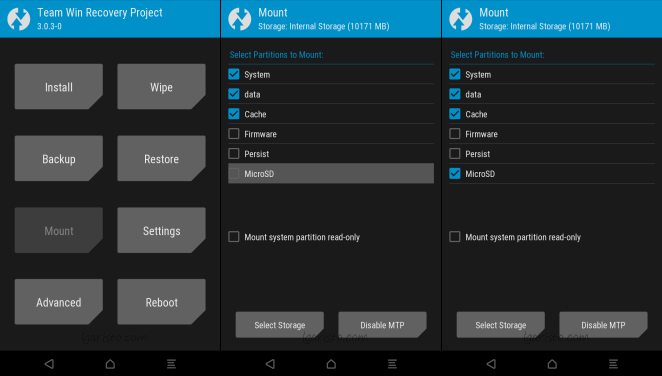
To do this first click on “Wipe” as shown above

Now click on “Format Data”
Type yes and click on the “tick mark” to start formatting.
Now go back to the first TWRP screen.
Before clicking on Mount, as shown above, we’ve to transfer the no-verity-opt-encrypt-5.1.zip file to the sd card.
Download the file from below link and transfer it to a micro sd card.
You can also download the file to Phone’s Internal Memory.
Insert the micro sd card in your LG Aristo
Now click on “Mount”
“Tick” MicroSD to mount it.
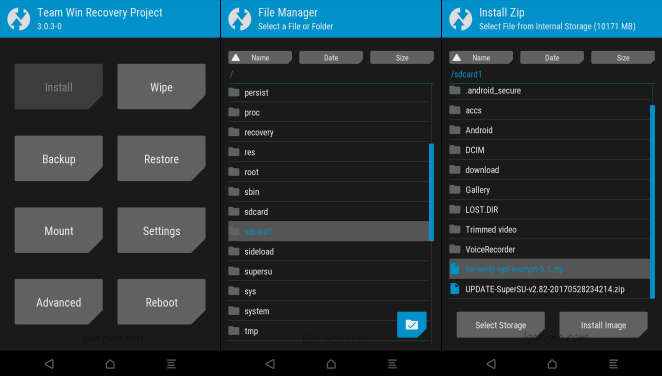
Now go back again to the first TWRP screen and click on “Install”
Select “sdcard1” and locate the downloaded zip file i.e no-verity-opt-encrypt-5.1.zip
NOTE: If you’ve downloaded the file to Internal/Phone memory you’ll find it in “sdcard” folder, a folder just above “sdcard1” as visible in 2nd screenshot above.
Click on the file “no-verity-opt-encrypt-5.1.zip” to install it

To confirm installation, slide the bar towards the right.
Now we’ve successfully installed TWRP. As we’ve flashed no-verity.zip file the custom recovery won’t get erased on booting the phone in recovery mode.
Now that the custom recovery is installed rooting is just a one-click process. Follow the next tutorial to root your LG Aristo.
If you’re facing any issues please let me know via the comment section below.
Source – Messi2050@androidforums
this part i dont understand:
“Agree to keep the system partition read-only by swiping the bar towards the right as shown above”
did you mean “…by NOT swiping the bar…”
Cause I’m just NOW realizing that you just might have meant to write “NOT”… cause I’ve been like “WTF!?!?! Over!”
Why do I only get this and I am following directions exactly. Man I miss Android Version 4.0 it was the easiest to root
so if youve flashed the no verity zip file before the super su file is there any way to install the super su? everytime i try i get sent into twrp which runs and sends me back to main set up screen and i cant access twrp again? am i screwed
Flash TWRP once again and repeat the steps.
it says, phone not rooted
Hice la instalacion y salió bien pero despues de unos minutos quise abrir mi gmail y me arrojó una ventana donde decia que la app se ha detenido y tambien con ptras apps pasó lo mismo hasta con los servicios de google play, busque informacion y para resolver el problema tenia que hacer un factory reset, asi que procedi a hacerlo pero tuve el mismo resultado y ya no puedo resolver el problema nisiquiera haciendo el factory reset, alguien podria ayudarme con eso porfavor?
all the procecces went tru bu am seein a blank screen cant do nothing else
me quede en el error FAILED remote unknown command
Hola buasn tardes mira realize el 70% procedimiento pero la pantalla queda congelada no funciona el tactil no puedo finalizar el procedimiento
Any one fix the unresponsive screen in twrp?
I’ve made it to the third screen shot at the TWRP screen requesting a password for which I should click on “cancel”. However, the touchscreen is unresponsive. All I can do is use the power button to turn the display on/off. I can’t even power off unless I take out the battery. If I reboot normally the touch screen works fine.
I got this same issue
Wow~ You saved me.
I was installed twrp successfully but, first time log into custom recovery was fine.
But when I try to log in again there is NO twrp, tried reinstall twrp many times and same result.
After read your post, and installed ‘no-verity-opt-encrypt-5.1.zip’ and no more disappear
and installed supersu, now successfuly rooted.
Thank you very much. 🙂
Hey, I’ve gotten to the step where you have to hold down the volume key and select yes. However when I select yes, it shows the metro logo and goes right into the factory reset process again. TWRP hasn’t showed up at all yet. Every step so far has been followed correctly.
I unlocked the bootloader and uploaded the recovery.img successfully but after removing battery phone is not entering TWRP mode .I followed the procedure but it always goes to factory reset not TWRP mode.
Any idea please share .You can kindly contact me WhatsApp +2209965540
I’ve made it to the third screen shot at the TWRP screen requesting a password for which I should click on “cancel”. However, the touchscreen is unresponsive. All I can do is use the power button to turn the display on/off. I can’t even power off unless I take out the battery. If I reboot normally the touch screen works fine. Is this because I am attempting this on the LG Aristo 2 LM-X210MA?
I got an error message saying cannot determine image filename for ‘recovery.img’ what did I do wrong? Can anybody help?
Same problem here
ive done all steps until 2nd page when i go to hold and restart it sometimes brings me to that white page asking to factory reset . it wont takae me to next part after idk what to do
I don’t know why but says can’t be flashed in unlocked state
bootloop after flash recovery
Did you unlock the bootloader first before flashing the recovery file? I’ve tested it myself and it works without any issues
Recover your phone by flashing a stock ROM –
https://lgaristo.com/lg-aristo-stock-rom-firmware-kdz-ms210-m210-flashing-tutorial/
Bricked my phone thanks
You can unbrick it by flashing a stock firmware – https://lgaristo.com/lg-aristo-stock-rom-firmware-kdz-ms210-m210-flashing-tutorial/
Hi. Thanks for the tuto. How or when can I send the no-verity.zip file to the internal memory without erase it with the process in the previous page?? My micro sd port is broken so I’m forced to use the internal memory
Use adb sideload command for this…
this way you dont need to store the ZIP file anywhere in the phone.
use command: adb sideload [c:\path_to_zip_file]\zipfile.zip
in TWRP, select the Advanced Tab, then the Sideload function
What are the steps cause nothing happened
Got to the slide to unlock portion for the twrp flash install, yet screen is unresponsive, yet if i normal boot then no issues whats so ever?