Moto G Pure is the latest entrant in Motorola’s G Series. Looking at the specs it feels more like an E series device than G series. It comes with Android 11 out of the box & uses an entry-level Mediatek Helio G25 processor.
On Moto G Pure the Factory Reset Protection (FRP) gets enabled when you hard factory reset your phone via Recovery Mode. During the device setup, we need to verify with the previously synced Google account. It’s similar to the iCloud lock on iPhone.
Let’s use the latest and easiest 2021 hack to get past the Google lock on Moto G Pure without using a computer. In a few minutes, you’ll be using your phone once again –

After doing a hard reset on my Moto G Pure using the volume down & power keys, the phone reached the “Hi There” screen.
Let’s click the “START” button to begin the device setup.
We need to connect our device to a Wifi network.
My Motorola G Pure is connected to the Home-Wifi-4G network.

The phone is getting ready. We need to wait for a minute or two.
The next screen is “Copy apps & data”. Click “Don’t copy” to move ahead.

Now, it brings me to the screen lock password verification page. I don’t remember the password.
The alternate option is “Use my Google account instead”.
This time we are on the Google account verification screen. It’s asking to sign in using the last synced Google account.
Let’s use the latest 2021 hack to bypass the FRP lock on Moto G Pure Android 11 without a PC –
How to bypass Google Account Verification – FRP lock on Moto G Pure without computer Android 11 2021 XT2163
NOTE: There is one more method to bypass the Google FRP lock on Moto G Pure. Use the below link for the alternate method –
Moto G Pure FRP Bypass 2022 New Method

To bypass the Google account, we need to go back from the “Verify Your account” page to the “Hi There” screen.
Use the back button to reach the first page.

Now, click the “Emergency Call” button.
The phone dialer appears on the screen.
Click “EMERGENCY INFORMATION” 2 times to open this page.

Now, hit the “edit icon” located at the top-right corner.

On the following screen, select “Name” and then the “Profile icon”.
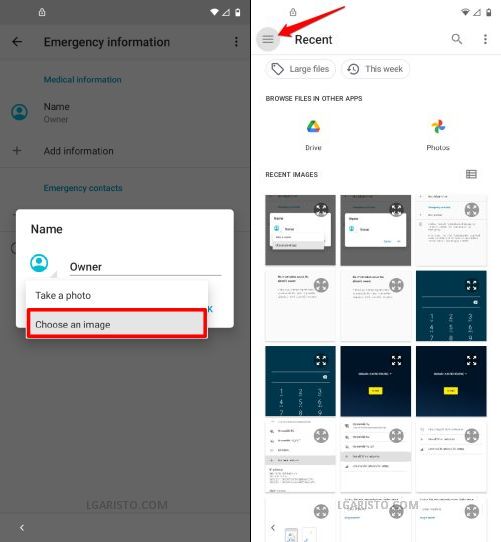
When the dropdown appears, choose the lower option – “Choose an image”.
This will take you to the “Recent” page of the file manager app.
Hit the “3 bar” icon at the top-left corner.

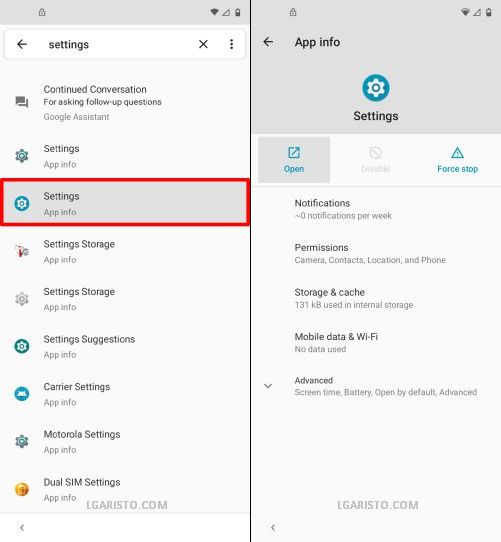
Now, long-press the “Drive” option as marked in the above screenshot.
It’ll bring you to the “App Info” screen.
On this page, select the 2nd option – “Permissions”.

Now, we are on the App Permissions page.
Click the “search icon” at the top-right corner and enter the term settings
When the search results appear, scroll down to the bottom.
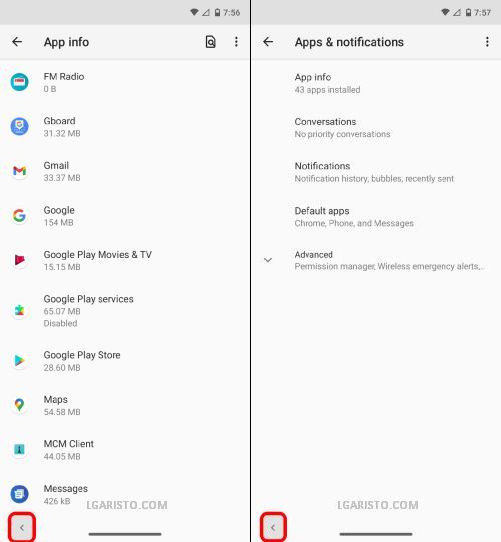
Select the 2nd “Settings – App Info” option with the blue circular icon.
On the following screen, touch “Open” to launch the Settings app.

Now, Go to “Apps & notifications” > “App Info”.

Using the “App Info” screen, we are going to disable 2 apps – Android Setup & Google Play Services.
First, pick the “Android Setup” app.
Click “Force Stop” to disable this app.

Now, go one step back and click on “Google Play Services”.
Hit “Disable” to turn off this app.

Now Force Stop” this app.
After disabling both the apps, go 2 steps back to the settings screen.
Tap the back button 2 times to reach the settings page.

Now, open “Accessibility” > “Accessibility Menu”

Enable the Accessibility Menu Shortcut. Confirm your action by tapping “Allow”.

Now, we can launch the accessibility menu with a 2 finger swipe-up gesture. We are going to use it later.

Restart your Moto G Pure.
Long-press the power button and tap “Restart”.

After the restart, we are on the “Hi There” screen.
Click “START” to proceed.
The next page is “Copy apps & data”.
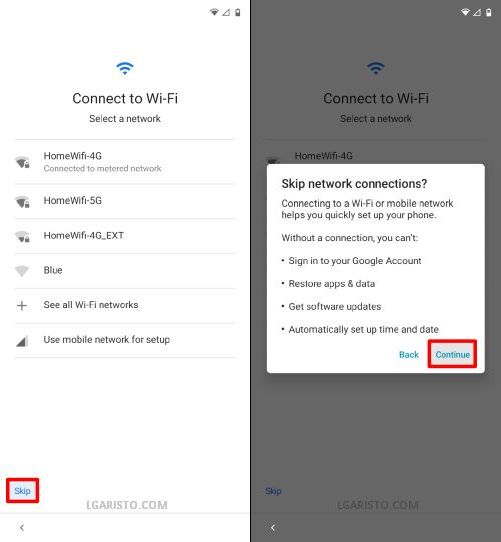
Click the back button once to go back from “Copy Apps & data” page to the “Connect to Wifi” screen.

There is a new “Skip” option on the “Connect to Wifi” page.
Click “Skip” and then “Continue” as shown above.

The phone now stays on the “Just a Sec” screen. To continue the device setup we need to enable the Google Play Services app.
Go back to the first page using the back button.

Now, use the 2 finger swipe up gesture to launch the “Accessibility Menu”.
Select the first option – “Assistant”.

Now, tap “Settings” and then “Enable” the Google Play Services app.

Once the app is enabled go back using the back button.

Click “START” to proceed.
Hit the back key once, when you reach the “Copy apps & data” screen.
Again click “Skip” and then “Continue”.

This brings us directly to the “Google Services” screen. We have successfully bypassed the Google account verification.
Accept the Google services terms and conditions.

“Skip” the screen lock setup. We can add it later.

Hit “Accept & continue” on the Motorola Privacy screen.
Turn off the “Subscribe to emails” option and click “Next”.

Tap “Get Started” on the gesture navigation screen.

Keep clicking “Next” to move forward.
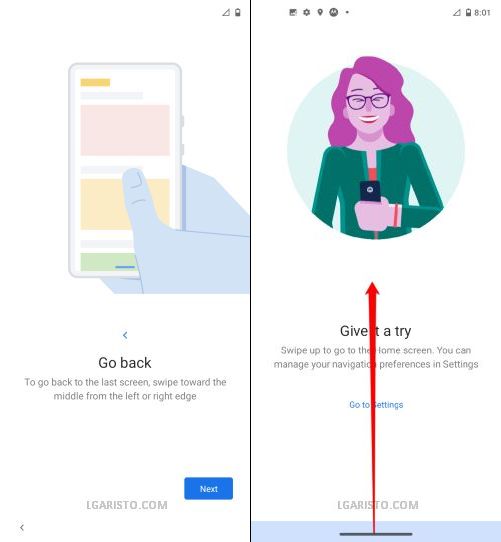
Now, we have reached the last page of the setup wizard.
We need to swipe up the screen to reach the Moto G Pure home screen. You can follow the arrow in the above screenshot.

We have successfully landed on the Moto G Pure home screen, thus bypassing the Google lock.
If stuck at any stage, feel free to leave a comment below.
Can’t select drive at the emergency contact section it says I need to have a Google account setuo
You need to long press on Drive
Thank you very much
Your post helps me on my moto g pure
Hey,,, question,,, so how do I find where to bypass the 2 step verification for my gmail account,,,I know email and password, but the directive I’m being given is an old phone number that I don’t have access to anymore,,,, that’s it. The phone is directing me to go to settings, Google, and manage my account,,, my account isn’t there. I can get to my email on my laptop, but don’t find the option to take off the 2 step verification. My original phone died and it’s being mailed in for warranty – will not cut on at all.
Thanks for any advice you can give 🙂
Awesome thankyou worked very easy
I tried and I’m stuck on the select images cuz it says that I first need to have a Google account on device to search for images and that’s not possible
Hell yeah bro, first device that an frp bypass hack w/o a computer has ever worked let alone the first time normally whn using the actual bypass software on a pc, which ur forced to buy the full/premium version due to the one tool(a.k.a the frp bypass tool) in the pc ran software, is one of the only two tool’s on the software that your unable too access/use via the free version of the pc application, of which forces u to agree/suascribe to the “free week trial” and give out ur cc/banking card info to procee to ur “free trial” of their app and use anyother one of the nearly pointless software programs to most people unless they somehow reset their phn w/out either backing there info up onto either their google drive or googles “cloud server’s, &/or just transfering any data they want to retain after there finished factory resetting their device back to brand-new in the phn’s eyes(if u remember to remove ur google & other accnt’s b4 resetting ur phn tho(&/or forget the password to ur google, otherwise ur stuck with a bricked phn unless u can somehow get super lucky finding this same step/step guide in bypassing the frp lock tht just got triggered to turning on by ur forgetfulness with logging out of any/all accounts actively logged in on said device ur wanting to restore to factory brand new as it comes right out the box whn u first get it into ur hands following the purchase of it new in stores. Even witg all tht said, nd all the info/smart asf ppl who knw some trick shit to get arnd most passcodes & passwords via hacks, backdoor entry methods using a command shell to write a script to either force their way in the theoreticle “front door”, & if met by a failed access attempt via the right/legit portal tht was made by the devs to grant access via the entry of the right password/code etc. But if all else failed and u cant go in the easy way without the password, nd u knw enough coding secrets to actually write a custome script urself thtll make a “backdoor” accesspoint thts accessable by writing the script tht will take you into the devices “core command shell” tht normally is only used by the devs tht worked on ur device during its creation, which theyll normally hide said command shell & lock it frm finding/accessing it, much less managing to launch it into a running state if u manage to get thru that password, at which point youd by free to write & create any line of script/code and either set its true desired destination/function, (frm the hiden frm basic & beta users)factory function & destination locating list the devs made purely as a personal refference list to double check tht the lines of script & code thex create when writing the devices programming for their very 1’st/ first couple times their working on it during production of the device, just as more oe a referense to rely on to show themselves the general outline, and all the innerworkings(this being the active running lines of script & code’s that every computer has their own unique set of tht make up the highly advanced version of a brain tht controls and tells any/all computer operated hardware.)all of which is the “brain cells” well call and discribe the functions and what/how they manage to work,etc. But in general thts the make up of a running computer & the software program(‘s) tht make it all run smoothly/correct
Omg thank you this is the only one that actually worked!
Once I gift the connect to Wi-Fi after enabling the Google Assistant it did not take me straight to the Google services page
Did you click “Skip” on the “Connect to Wifi” page?
Awesome thanks it actually works!!
Worked on moto g power as well. Sweet. Thanks a bunch. Nice and clear, easy to follow instructions. Step by step with screenshots.
Awesome. Worked great. I bought an amazon return phone and was able to get it going again using using this easy to follow menu. Many thanks.
Hey there! Very cool and thank you for your help on this. Good stuff. I will indeed subscribe. Thanks again. Can ya dig????
thank you !